Zhang Zhaoxin, Director of Process Room, Hubei Hangyu Jiatai Aircraft Equipment Co., Ltd.
As a critical component of the power system, the integral impeller operates under high-speed rotation and requires excellent dynamic and static balance. To achieve optimal performance, the blade design features a large twist angle, high precision, and superior surface quality. The flow path surface must be smooth to ensure efficient fluid dynamics. The main surfaces involved include the cladding surface, flow surface, pressure surface of both the main and sub-blades, as well as the suction curved surface. The pressure and suction surfaces are key working areas of the impeller, typically designed with straight or complex non-linear shapes.
Model Construction
(1) Base Body Construction: The base body of the integral impeller is created using a wrapping function around a rotating shaft, incorporating a flow path surface for structural integrity.
(2) Blade Integration: The focus of the model construction lies in the accurate representation of the blade surface. This paper introduces a method that uses the blade midline equation to define the control curves of the blade surface. By intersecting a series of coaxial cylindrical faces with the blade’s mid-plane, a set of mid-surface curves is generated to build the blade's mid-plane, which then forms the blade surface.
Example: Y = 1.272 × 10â»â´ × D × X²·â¶â¶. This equation defines the relationship between Y and X values on the curve. Further analysis shows how the arc angle (a), arc length (L), and coordinates (X, Y, Z) relate:
Y = (D/2) × cos(a)
Z = (D/2) × sin(a)
a = (L/D) × (360/π)
The relationship between L and X is defined by the midline equation:
L = 1.272 × 10â»â´ × D × X²·â¶â
The pressure and suction surfaces can be obtained by offsetting the blade’s mid-surface. Using topological relationships and boolean operations, the solid model of the impeller can be constructed effectively.
Manufacturing Process
The basic manufacturing process includes: 1) blank production—machining the impeller surface; 2) CNC machining—milling the blade surface, runner surface, and transfer fillet; 3) dynamic and static balance testing—adjusting the balance by removing material in specific areas based on test results; and 4) surface treatment—applying anti-corrosion and wear-resistant coatings as per design specifications.
Challenges in processing include:
(1) A significant blade twist angle;
(2) In this example, the average blade thickness is 1.4 mm, with a maximum overhang of 22 mm. This poor rigidity leads to vibrations during machining, causing defects like undercut, overcut, and squeegee. It also affects dimensional accuracy and surface quality;
(3) Small blade pitch—minimum pitch is 2 mm, with rounded blade roots (R1). For finishing, a small ball-end mill (f1.5R0.75×3°-L45 taper shank) is used. However, the tool has a high aspect ratio, low rigidity, and limited cutting efficiency, making it difficult to maintain accuracy and surface finish.
Process Parameters
(1) For rough machining, the main parameters include cutting speed (V), depth of cut (ap), cutting width (ae), and machining allowance. When using a ball-end mill, ap and ae are generally set to 30% of the tool diameter to maximize material removal while maintaining stable cutting forces. Cutting speed is adjusted based on the impeller material and recommended tool parameters. Typically, a 0.3–0.5 mm margin is left for finishing on the blade and runner surfaces.
(2) Finishing process parameters mainly involve cutting speed (V), radial step (p or ae), and feed per tooth (fz). Cutting speed is determined based on material properties and tool recommendations, and spindle speed (S) is calculated using the effective diameter (De) of the ball-end cutter (see Figure 1).

Figure 1 Ball-cutter actual machining position, effective diameter
The formula for calculating the effective diameter of a ball-end cutter is:
De = D × sin[β + arccos((D - ap)/D)]
The effective cutting speed of the ball-end cutter is given by:
Ve = (π × D × S) / 1000 × sin[β + arccos((D - ap)/D)]
In the formula, Ve is the effective cutting speed, D is the nominal diameter of the ball-end cutter, De is the effective diameter, S is the spindle speed, β is the inclination angle of the ball-end cutter, and ap is the cutting depth.
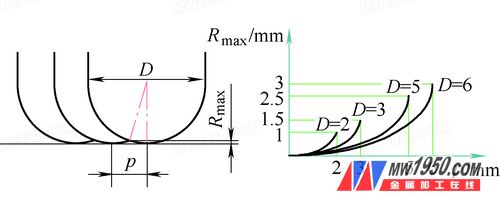
Determine the allowable residual height based on surface roughness requirements, and set the radial step p (ae) accordingly (see Figure 2).

Figure 2 Relationship between step p and theoretical maximum residual height Rmax
Rmax = D/2 − [(D/2)² − (p/2)²]¹â„²
In practical applications, the radial step p is typically set to 0.5–0.8 mm for semi-finishing and 0.1–0.3 mm for finishing.
Smart Light,Smart Strip Light,Smart Ceiling Light,Smart Breaker
JIANGMEN MOSCOT OPTOELECTRONIC TECHNOLOGY CO.,LTD. , https://www.sensorsled.com