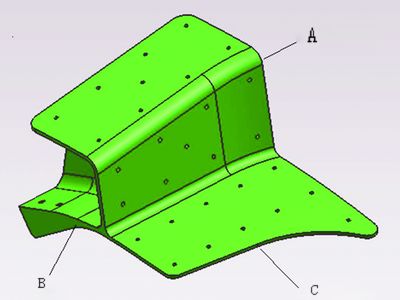
This part is aerospace structural parts produced by the company. It belongs to the thin-walled and difficult-to-machine parts (see Figure 1). The thinnest part is 2.5mm, the material is 7050-T7451 AMS4341, and the minimum containment size is 180mm× 95 mm × 123 mm, the surface roughness value Ra = 3.2 μm is required.

figure 1
Process analysis
(1) The part except the two sides (see Fig. 1A, B) is a parallel plane, and the rest are curved surfaces. The small holes on the curved surface are normal holes, especially the side contour of C is perpendicular to the adjacent surface, so Five-axis simultaneous machining is required.
(2) The wall thickness of the part is thin, the contour of the surface is required to be 0.5mm, and the wall thickness at the right end of the C contour is only 2.5mm, and the rigidity is poor. The vibration knife and the knife should be avoided during processing.
(3) Most of the parts are curved surfaces, which makes it difficult to locate and clamp in CNC machining. Therefore, in the digital milling processing scheme, the process chuck is required to provide the positioning reference and the reliable clamping plane.
2. Number milling processing solution
In order to solve the problem of clamping and positioning of the part, two processing schemes were designed.
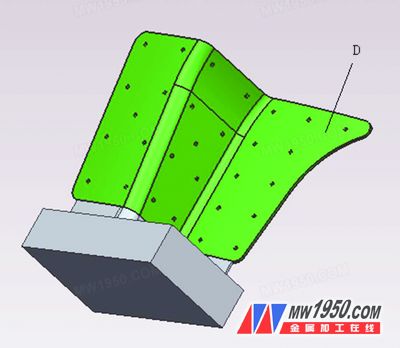
(1) Set the process chuck on the end face of the part A, clamp the chuck part with a vise, and finish the rest of the part. Finally, use the wire cutting to remove the chuck along the end face of A. The chuck setting is shown in Figure 2.
The advantage of this scheme is that the five-axis clamping can be used to complete the processing of multiple faces of the part at one time, avoiding large positioning errors caused by multiple clamping, and facilitating production preparation before processing (no special tooling or combination fixture is needed). The machine tool is used to remove the chuck, and the cutting surface is relatively regular and beautiful; the disadvantage is that the workload of the five-axis machining is large, and the cost after mass production is high. In Figure 2, the D area is poorly machined and easy to vibrate.

figure 2
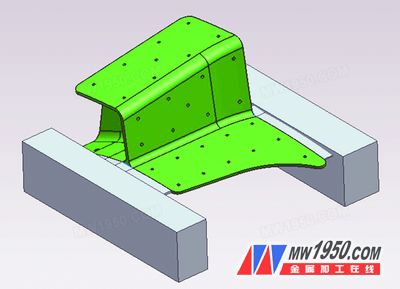
(2) Process chucks are arranged on both end faces of the parts, and positioning holes are made on the chucks. As the sole reference for multiple clamping, the chucks and parts can be made thinner at the joints, and finally removed by ordinary milling machines. Chuck. The chuck setting is shown in Figure 3.

image 3
The advantage of this scheme is that the problem of insufficient rigidity in the number D milling of the part D in the solution one is solved. The parts can be clamped on the three-axis machine tool for many times to complete the processing in most areas, and the number of milling can reduce the processing cost; the disadvantage is that the work of removing the material head is large, and the skill of the operator is high.
By comparing the above two processing schemes, it can be seen that the processing method of the second scheme is economical, feasible, and the risk of implementation is low. Therefore, we choose Option 2 to implement.
3. Process and processing
(1) Material status of the part is imported aluminum alloy sheet, the unit price of the material is about 4.75 US dollars / lb, and its material cost is a high proportion of the total cost of parts. In order to save materials and according to the contour shape of the parts, we use nesting processing, as shown in Figure 4. In order to reserve the process chucks on both sides, the square material size is set to 280mm × 194mm × 110mm, and the wire cut is used to cut along the contour of the part (in two pieces of "L" shape), and each piece can be processed into two parts.
(2) The three-axis machining part of the blank after cutting firstly positions the positioning reference surface and the reference hole in the area of ​​the process chuck, and the pressure groove for pressing the upper bolt, as shown in FIG. The vise is used to clamp the parts, and the upper surface is flattened with a scalloped milling cutter to ensure a flatness of 0.02 mm. The positioning holes are machined to f10H8 with a spacing of two holes (178 ± 0.03) mm.
In the process of the sample processing, in addition to processing the two positioning holes and the pressing groove, the rough finishing of the subsequent parts is completed on the five-axis machine tool. Since the cost of five-axis machining is much higher than that of the three-axis milling center, we have refined the content of the milling process and tried to use the three-axis machine tool as much as possible, which greatly reduced the processing cost of the part. The specific processing route is as follows.
Three-axis number milling processing part: First, the process contents of FIGS. 6 to 9 are processed by positioning the bottom surface and the two holes. Step 40: Positioning the step surface processed by the two positioning holes and the steps 15 and 20, as shown in FIG. The joint between the part body and the process boss is 2mm thick and extends 12mm (at A and B) for subsequent cutting. When the open cavity on the side is machined in the 15th process, there is an undercut surface in the machining direction, as shown in Fig. 11 in the area of ​​the UG draft analysis. This area can only be left on a five-axis machine for machining.
For more information, please download the attachment or view Metal Processing (Cold Processing), Issue 15, 2013:
Measuring Tape MID certification; ISO9001 certification;
1. Measuring tape Case: First-grade new ABS plastics: Bright, odorless.
2. Graduation: British-metric; metric; British; Luban etc.
3.Measuring tape Blade: steel,white and yellow colors,matt and shiny or chromed
4. Hook: Magnetic or common (it depends on custom request) the hook is flexible
5. Rivets: 3or 2 rivets hook reduces risk of breakage; the rivet can be fastened to a proper position
6. Belt: The belt is made with Nylon for more handy and durable
7. Measuring tape Size: 1m/3ft-10m/33ft
Free Samples
We will offer you free sample within 5 working days after your comfirmation of details and
invoice.
Quality Guarantee
We will check the products strictly one by one before arranging the shippment.
Price Discount
We will give discount to the long term business partners or the big order.
Customized Service
We can offer the OEM service based on clients' requirements such as the color,label or the
package,etc.
Measuring Tape
*Impact resistant rubberized case;
*Heat-treated spring provides long life and smooth blade rewind;
*Strong belt clip
Rubber Injection Measuring Tape
Rubber Tape Measure,Stainless Steel Tape Measure,Heavy Duty Steel Tape,Rubber Injection Measuring Tape
Oukelong Tools Co.,Ltd , https://www.oukelongtape.com